Follow us on Facebook

Showing posts with label DIY. Show all posts

Wednesday, February 20, 2013

organisation ahead

Lately, more and more persons have been asking how I manage to get everything done with my many hats...my response is 'I'm organised.'

This seems to be a figment of imagination for some, but as I see more persons talk about their challenges getting everything done (and I overcome my own), I've decided to share some of my organisation tips and strategies that help keep me on track.

I'll make one post each Sunday in March (so that means five posts in total). Each week I'll focus on another method, tool, or area of your life that you can try to pull together with just a little organisation.


Now here's my disclaimer to all readers: 

Don't feel that because I've got these organisation methods and techniques going, then it means I don't have a few spells of disorganisation. I can say though that based on my own experiences and the experiences of others who have adopted these tips and tricks, things stay all organised once you maintain the structure put in place.

To be honest, over the last two months or so, I've been the least organised ever! I assume that it's because I was sick almost twice in a row during Christmas. That definitely caused some setbacks with the things I needed to get done and keeping up with everything I needed to focus on. Fortunately I'm getting back on track using the same methods that helped keep me sane over the last few years!

.......And I'm super excited to share them with you!

I'm also hoping to get some sample docs together so you download and print for yourself.

Tuesday, March 13, 2012

DIY: bye bye broken make-up

After buying the perfect palette and probably using it a couple times, many fab femmes have the same problem where it slips from you, falls to the floor and shatters.

Based on the stories I've heard, more often than not it happens when you're rushing to get ready and have no time to figure out how you'll fix it.

Recently it was just my luck that my pressed powder fell and cracked a bit. So I went on a hunt to find a fixer because in my mind 'this must happen to other women and there must be a way to fix this.'

TADA! The solution was right there on YouTube!

I was so excited for a solution that I forgot to take pics (sorry guys) but I've embedded the video that I used below so you can try it. There are a number of these videos on YouTube with different persons fixing their broken make-up. The methods are the same, but this is the one I thought gave the best up-close and step-by-step solution.


While the problem I had was with my pressed powder, know that it can also work with your eye shadow and blush (I tried it with blush as well...but not the eyeshadow).

So here are my recommendations:
     1. Try to find the 'perfect sizes circle' before you start 
        the process. That way you're sure it will press to fit 
        the circle better and more evenly.
     2. The alcohol they refer to is rubbing alcohol. I don't 
        know if the alcohol for drinking works....I stuck to the 
        script.
     3. Use a bobby pin or something smaller than the knife to 
        help mixing powder and the alcohol. I found it to be a 
        lot less messy. 
     4. Avoid using soft tissue! Hand towel is the best bet. The 
        softer tissues leave little bits behind.
     5. Leave the make-up open for about a day for it to dry 
        completely. It may harden pretty fast but that may not 
        mean it's fully dry underneath.

I hope this saves your broken make-up disaster!

Tuesday, February 14, 2012

45-minute dress


The other night I was influenced by the design and sew bug (yes believe it or not I can do a bit of that).

I got my mom to do some of the fine-tuning when I got tired of doing it all (the somewhat short attention span is the issue) but more or less it was me. =]

The influence of course are the cute free flowing dresses that are perfect for spring. What's cute is that the material I used has tiny yellow and green flowers on the navy blue background.


I don't love the pic.....but it's the best one showing the dress.

All I added to complete it was a children's belt (yes that's right I shopped in the little kids department), simple accessories (because I had a play-date and meeting at a school that afternoon) and of course my handbag and wedges.

Although there really is no pattern that I can share with you...I can tell you that you can use a dress you already own, inexpensive material, and just a few minutes. =]

Saturday, February 4, 2012

DIY: overnight pimple remover

Two days ago I woke up with an atrocious pimple on my left cheek. I did my usual routine with my face scrub and all....but the pimple was not moved or shaken!

I honestly got a tab bit annoyed because the pimple was so large that even foundation and concealer could hide it. -_-

Then I remembered that in the InStyle October 2011 issue I saw a little remedy for an overnight pimple remover.

Here's the simple three step plan:

1. Ensure that the area is clean (I used my usual face scrub, then used a little alcohol to wipe the pimple and the area around it)
2. Put hydrocortisone directly on the pimple...more like slather it with the cream (I used an antibiotic ointment instead - Triple Antibiotic Ointment to be exact)
3. Cover with a waterproof bandage (Be sure to seal it all the way around so that it doesn't come off in your sleep)
It worked like a charm! The following morning there was no pimple!!

woohoo!

This really did make my day yesterday...hope it works for you! =]

Thursday, December 22, 2011

DIY: sugar cookies

As with most families around the world, there are a number of Christmas traditions in my family, especially as it relates to food.

Usually the holiday isn't complete without baked ham, grilled salmon, Mommy's special macaroni and cheese, Grandma's potato casserole, family recipe sorrel and Christmas cake (both of which I don't like), red/white wine to go with it all, and of course sugar cookies!

Once upon a time I had my superb sugar cookie recipe that was altered to perfection...but then we moved, and when boxes got all mixed up my little recipe seems to have gotten tossed to some unknown location. (it surely sucks that I'm the most organized person in my house)

So, because of that....my tradition of baking sugar cookies continues with a different recipe almost every year (until I alter to my standard of perfection). Usually after the first batch though, the recipe is so 'not to Kim's perfect standard', that I just toss it out completely.

This year my neighbour and I happened to try the same new recipe from allrecipes.com (click here to check the recipe out) and it was nice and easy and the cookies came out pretty good. (of course she baked them first and after sampling her set I accepted that it's a good start).

my 2-inch square sugar cookies


For my cookies, the only thing I added to the recipe was candy sprinkles. Also, instead of rolling the dough into balls and placing them on the cookie sheet, I rolled the dough out to half inch thickness and cut out 2-inch squares. I think this would give me more than the 48 servings stated in the recipe; but since my family was eating the cookies as each tray came out, I'm not even sure how much was done in total!

On another note, besides the fact that it tastes good and was nice and easy, I got a good amount of cookies from the batter and was able to see the nutritional info per serving in the recipe! That my dear friends is just perfect for the folks who want to watch what they eat this Christmas.

I'm definitely going to have to get another batch done before the season is done, but trust me, you should try it!

Saturday, December 17, 2011

pretty glitter fingers!

I'm usually very simple when it comes to nail polish colours and designs. As a matter of fact, I rarely go for designs unless I get my nails done with acrylic tips.....and even then I only go for french tips.

Overall I'm not the biggest fan of acrylic anyway because all it does is damage my already thin nails. So, I've been doing my best to give my nails some love and keep them all neat and girly. Problem is, I get tired of seeing them looking the same way for too long, and it's the worst thing ever when the polish starts chipping. My solution is to change my nail colour every week, or to not bother to apply polish at all.

But! I was feeling so darn festive that I kinda got way with myself yesterday. My little sister (who usually only wants something when you have/need it) wanted me to do her nails. As usual, I did the two coats of polish and then noticed the super fine gold glitter on my night stand.

And of course I decided to add a little sparkle to her tips. =D

There were a number of trial and errors because at one point the glitter looked odd with the colour polish; and at other times she just wouldn't keep still!

Anywho, I made a French tip stencil out of a piece of wax paper and pressed it against her dried nail. Using clear polish as my adhesive, I brushed a little onto her tips, and then sprinkled glitter onto the clear polish. Finishing it off, I allowed it to dry and did another layer of clear polish over the entire nail.

The final product: ten pretty glitter fingers! (although she was so impatient and wouldn't wait and have me clean them up)


I know she's like me and will get tired of them in no time, so I figure that in a few days her nails will go back to blah......maybe I'll do this on my own nails for my night out on New Year's Eve!

Friday, December 9, 2011

DIY: photo frame notice board

A couple nights ago I couldn't sleep and 3am came and met me (what else is new). I sat up watching episodes (that I've seen before) of My Wife & Kids with the volume down hoping that boredom would take over and I'd fall asleep......

That didn't quite work but anyway...In one episode, the son (Junior) who isn't the brightest crayon in the box, did the SAT's and surprisingly came home with superb scores (by the end of the show you found out that he got the wrong results).

While in his 'genius mode' he would scribble all his 'brilliant thoughts' unto his mother's glass door with a marker. That kinda made a light bulb go off in my little brain. I remembered a friend of mine who had scribbles on her bedroom mirror using a dry erase marker.

Now today (while I was cleaning my room) I decided to run a little test and used my dry erase marker to put a smiley face n my mirror. I got a bit of felt and wiped it off (of course just to make sure that my Mom wouldn't go berserk if she saw it on the mirror).

It worked!.....and from there my 3-year-old mind went around the house scribbling on any random bit of glass I felt like lol. After scribbling on a picture frame and giving my sister a randomly placed bow on her head, that's when another light bulb went off.  

And from there.....this DIY project was born *insert cool dramatic music here*

Now it's really easy and all you need is:
- a picture frame
- a dry erase marker
- a picture
- a square of felt
- 12inches of ribbon/string


1. The first thing I did was to use the backing of the frame to size the picture I was going to use.
2. After measuring it up, I cut along the lines to make the picture small enough to fit into the frame
3. I placed the picture into the frame and fixed the backing in place.
4. I need to get a nail in place to hang this on my wall, but for now it can just stand on my night stand and remind me of the things I need not forget.....or the errands Mother dearest wants me to do for her.

Oh....for the eraser, I looped the ribbon through the frame and did a quick stitch to attach it to the felt (that way it never gets lost).

Viola....the picture frame notice board.

Thursday, December 8, 2011

DIY: wrapped bead bracelet

I promised DIY projects but because I had not pics I wasn't posting them. (sorry)

Well, now that we've solved that problem! Here's one really simple project I did for less than JA$500 (US$5).

The first thing to note is the fact that I could probably find this here in Ja....but it would probably cost much more than it cost to make it.

Anywho there are only 3 items needed to make this happen. Please note that the colour, size and design of each item is really up to you.
You'll need: 
1 embroidery thread (about 34inches long)*
2 beads (the amount needed will depend on the size of the beads....but I'd advise to not make the beads too large)
3 jewellery fastener (the fastener I selected is very easy to attach)


*to determine the length of the thread I measured the size of my wrist (mine was about 6inches), multiplied it by 5 (totalling 30inches), and added 4inches (remember you'll be knotting the fasteners and needing that extra bit of string.
The project needed only 3 items, and was finished in only 3 steps:


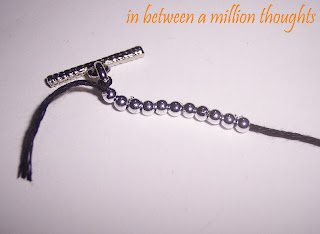
STEP 1 - Knot one side of the fastener onto the thread. I would recommend that you knot about three or four times to make sure it's secure and leave some thread hanging in case you need to loop it again. 


STEP 2 - Start threading the beads onto the side that is attached to the fastener. This may be a tedious task if the beads are small so your patience is surely an asset lol
STEP 3 - When the string or beads is almost full, knot the other side of the faster to the thread. Once again be sure to do it about multiple times to make sure it's secure. Then of course you can cut those extra strings off.

And that's about it. But then of course you're probably wondering how this becomes a bracelet.....simple....wrap it around your wrist!

Remember to check the length of the embroidery thread in relation to the size of your wrist. As I mentioned, mine was long enough to be wrapped about 5 times but depending on the length of string you choose and the size of your beads it may be more or less.
I decided to keep it simple because I have really small wrists and bulky bracelets tend to make me look super skinny. =(

Anywho, it's all up to you and you can make it as unique and complex as you want. =]

Wednesday, November 30, 2011

that super moist choco-chocolate cake

I mentioned the fact that one of my boyfriend's birthday cakes was my grandmother's super moist choco-chocolate cake recipe.

Although I won't be staring the lovely recipe with you (sorry) I will give you an idea of what makes it the cake it is. We made two 9-inch chocolate cakes and covered them with extra whipped chocolate icing (of course some went in between the layers as well). After giving it a fine coating of icing I changed the recipe a bit and instead of making my own chocolate I used store-bought milk chocolate to top the cake with chocolate shavings and had some fun with a Kit-Kat bar for the centre.


Super Moist Choco-Chocolate Cake

I can tell you for sure it was super delish!

Friday, November 11, 2011

testing....

With a whole lot of free time on my hands, I think I'm ready to get back into testing out some inexpensive DIY projects.

About a month ago I made my own cropped top and a number of people thought I bought it in Forever 21. lol I was pretty shocked, not because they liked it, but because my limited sewing skills seems to be hidden. [go me!]

Anywho, It's been quite a while since I've done much of any DIY stuff, and I will admit from now that I know they all won't come out the way I want! More often than not I'll show you how to update a garment or accessory; sometimes I'll make accessories from scratch and other times when I feel moved....I'll sew.

I can promise inexpensive yet good-looking, but I cant promise that they'll all be 'quick fixes'....especially since the one I've been working on took soooooo much patience and time. *phew*

Look out for some DIY's!